Performance Driving Basics
Performance Driving (HPD) is a safety-minded high speed event where you drive in groups with drivers of similar skills and speed. HPD provides an opportunity for you to develop the skills and knowledge to help you deal with driving situations you encounter every day and on the race track.
To drive well there are three basic tips.
Be smooth in your driving, it is the key to learning to drive quickly on the track.
- Steering input should be smooth and precise. Avoid yanking or sawing the wheel to make a turn.
- Apply the brakes or throttle with a firm, fluid, quick movement of the foot. Sudden changes in throttle, braking, or turning upset chassis dynamics and will send you in the wrong direction!
Be aware of what's going on around you. Pay attention to what your car is doing now and what you expect from it next.
- Always look up ahead. Don't just look at the taillights of the car right ahead of you.
- Anticipate what is coming up next. Know what you're going to do beforehand.
Be calm, relaxed, and alert. Keep things under control in the driver's seat. You should never be angry!
- Make sure you are driving the car. Don't let your car drive you.
- Don't get in a situation where things are happening too fast for you to be comfortable.
Good braking and turn in are the most important and the most difficult to do right. Start by driving slowly and doing things at the right time to develop a rhythm. Good driving is very rhythm oriented so smoothness and visual skills are key.
Driving a road course at a track event is mostly about brakes, tires and suspension. You can easily spend several thousand dollars on chassis, tire and brake upgrades, but they are not necessary to have a fun day at the track.
Vision
Content Coming Soon.
Tire Adhesion
Your car adheres to the road surface with four small contact patches provided by your tires. Each contact patch is about the size of half your shoe. All four combined will fit onto an 8.5X11 sheet of paper. Now, imagine your shoes supporting and guiding a 2000lb to 3000lb race car. Pretty amazing isn't it. The size of the contact patch varies with tire inflation pressure and with vehicle weight transfer from braking, accelerating or turning. Actions from your suspension determine how much adhesion you will get from your tires.
A tire can only provide a certain level of adhesion. When you exceed the tire's adhesion limit it will either be spinning, sliding or skidding. Once a tire is to this point you will no longer be in control of your vehicle.
Weight Transfer
Acceleration will transfer the vehicle's weight to the back of the car. This action decreases the size of your front tires' contact patches making the car less responsive to steering inputs but you now have extra traction in the rear.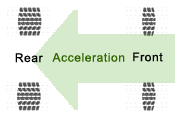
During acceleration, weight is transfered from the front wheels to the rear wheels, illustrated here by the difference in the thickness of the tread patterns.
Braking or lifting the throttle will transfer the vehicle's weight to the front of the car. This action increases the size of your front tires' contact patches and reduces the contact patch of the rear. You now have more traction from the front tires than the rear. Your ability to steer improves but your rear-end is more likely to lose traction.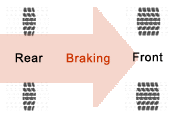
Under braking or deceleration, the opposite occurs.
Turning, around a corner, will transfer the vehicle's weight to the outside tires. When you are turning around a corner while braking most of the weight of your car transfers to the outside front tire.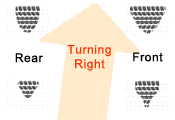
Braking while turning will transfer a majority of the weight to the outside front tire.
Understeer (push) - The car under performs to your steering inputs. The front tires are skidding; they've passed their limit of adhesion. The front tires can't respond to your inputs. The car wants to continue to go straight Most cars are built to understeer at their limits. Sliding in a straight line is preferable to spinning and the natural reaction to a situation like this is to get off the gas. This transfers weight to the front giving those tires more traction and reducing the understeer.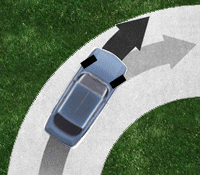
Result of Understeer. On an understeering car, the rear tires have the greater traction, and tend to push the car toward the outside of a turn.
Oversteer (loose) - The car over performs to your steering inputs. The rear tires are skidding. The back end wants to come around.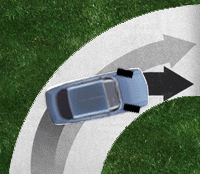
Result of Oversteer. When a car oversteers, the front tires have more traction than the rears. The nose wants to point toward the inside of the turn, and the tail wants to slide to the outside.
Nascar driver Fireball Roberts once said "Understeer is hitting the wall with the front of your car. Oversteer is hitting it with the rear."
- Neutral handling - This is when all four tires will lose traction at the same time so the car drifts instead of plowing straight ahead (understeer) or spinning (oversteer). This is the ideal situation for the race track. Some cars are easier to set up than others. Car such as the mid-engined Porsche Boxster, Toyota MR2 or an RX-7 (front engine, but it's behind the front wheels) are easier to set up for neutral steering as opposed to a RWD Mustang or a FWD Civic.
Skid Control
Proper hand position on the steering wheel at the '9 and 3 O'clock' position gives you good control of the wheel and makes it easy to determine when you have the front wheels pointing straight ahead. If you are trying to recover from a spin it's good to know when the wheels are pointing straight ahead because when you regain traction the car will head off into whatever direction the wheels are pointing at that time. If skidding look and steer in the direction you want to go. If you're looking off to the side of the road chances are you will mentally and physically steer there. This is a situation where looking in the right direction helps! If you lose traction and spin; 'both feet in' Press the clutch and brake pedals firmly to the floor. This will ensure you'll stop sooner and slide in a straight line. When a vehicle is out of control and the driver attempts to regain traction, guess what happens when it is restored? The car takes off in the direction it's facing when traction is regained--like into oncoming traffic. REMEMBER; Once you've lost control lock up the brakes and slide out of the way! If accelerating and the rear breaks loose then let off. If your velocity is neutral then accelerate. If you're going off the road attempt to go straight off; not sideways. Don't try to save it.
Braking
Braking in a straight line is the most efficient way to slow or stop a vehicle. Remember the section about shifting weight to the front and away from the rear tires and how turning transfers weight to the outside? It's inevitably too much to ask of your tires to brake and turn at the same time if you're near the limit of adhesion. The best braking is just short of lock up. Lock up means the wheel is no longer turning; it's skidding and it actually takes longer to stop. If the front wheels are locked they will not respond to steering inputs due to passing their limit of adhesion.
Trail-braking is a more advanced technique to help bring the rear end of the car around (oversteer) in a controlled manner when entering a corner. You basically continue to brake when beginning your turn-in for the Apex of the corner. Two-thirds off the brake as you turn in. You still have some understeer. This is a more advanced technique. Practice on slower corners when no one is behind you.
Corners & Turning
The main principal of driving a corner is to straighten out the corner. The larger your arc through the corner the faster you can go through. This principal is directly related to Tire Adhesion.
|
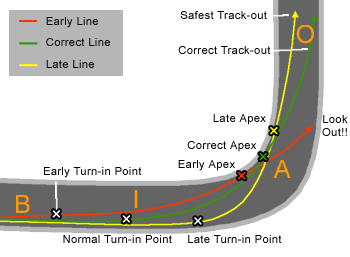
Braking. Point 'B' in the picture is the braking zone. All straight line braking should be finished here before your foot is on the throttle turning into the corner. Turn in. Point 'I' is your entry into the corner, start at the outside edge of the track. Farthest from the inside of the corner. You should have a steady steering angle and a constant speed to the apex. Smoothness is crucial at this point, now is when you commit to the turn. Keep your foot on the throttle in one place to maintain constant speed and hold the steering wheel steady in one position all the way through to the Apex. Apex. Point 'A' is where you are closest to the inside edge of the corner. The proper apex is usually not in the exact middle of a turn, but a little 'late'. Hitting the apex right determines how fast you can exit the corner. From the apex you should begin unwinding the steering and adding power as you now have available adhesion for accelerating. If you think about the Car Dynamics and Adhesion information previously you will see that accelerating out of the corner will be an understeer situation. You won't require much steering input to 'push' the car towards the outside of the track. Turn out. Point 'O' is the exit from the corner on the far edge of the track. At this point the steering wheel should be straight and you should be on full power |
Essentially, you traverse a corner "outside inside outside". Basically, you start at the outside edge for the turn in point and drive an arc to the inside near mid-corner, the apex, then drive to the outside again for the turn out.
If you turn in too late you won't be able to straighten out the corner as much as possible so you will be slower through the corner. If you turn in too early you'll hit the apex too early and you'll run out of track before you get to the turn out (you tried to straighten the corner too much.) As you can see turning in too early can be bad because you can get yourself in a situation where you have to turn in more after the apex where you should be unwinding the wheel and accelerating. If you're at maximum adhesion you have nothing left for turning and you will go off the track or spin trying to adjust. It's important to know that you hit the apex correctly. When starting out always turn in a bit late and apex late until you learn the corner.
If you have a series of curves to go through (S-curves) you want to be sure you're set up correctly for the last one so you can have the most speed going onto the straight at the end. This means you have to 'give up' the first corner to get set up correctly for the last. This usually means very late apexes for the earlier corners so you have proper turn in for the next.
Once you turn in the steering wheel should stay at the same angle until the apex. If you're sawing the wheel then your turn in wasn't correct. Ideally, if you are smooth and the car neutral you'll start drifting after turn in. Hold the wheel lightly. Turning should be smooth, soft and firm (yeah, 'soft' and 'firm' are hard to image together). Enter the corner at a constant velocity and maintain a constant speed from turn in until apex. . The car is neutral and easier to handle this way.
Begin adding throttle as you unwind the steering wheel. Remember the part of the limit of adhesion--once you start unwinding you now have available traction for accelerating.
To learn a particular corner: Keep the turn in the same, late apex and see where your track out is. Add speed until you run out of track at the turn out.
Look at the turn in, then look at the apex, then your turn out point as you pass them. Watch the cone until you're at it so you know how close you're getting to these points. Drive to the apex if you can, but don't lift off the throttle to steer to it or you may spin. If you miss it then you miss it. Do better next lap. Drive to the track out if you have to. Next time add speed so you'll drift out instead.
It's better to turn in too late than too early. You're pointed off the road after apexing if you turn in too early.
Racing Flags
Flags provide you with information on what is happening around you. For complete information on flags and their meanings go to the Racing Flag page.
Cones
The Bremerton course is marked by cones. The course is laid out in orange and green cones on the large paved tarmac surface (the old landing strip and taxi way). Cones are flexible and will not damage your cars, except for small scuff marks which can usually be buffed out. The following are common cones used at Bremerton events and their meanings.

Orange Cone (small)
Defines the road course layout

Green Cone (small)
Identifies the apex of the corner

Orange Cone (large)
Defines the braking zone or passing zone

Traffic Delineator
Defines the Chicane and/or braking zone Bremerton

Pointer Cone
Small orange cone laid on it's side pointing to upright cone. Informs you which side of the cone to drive on. You would drive on the side opposite of the inclined cone. Also can be used as directional markers.

